
It won't come as a surprise that California is in a drought – the topic is regularly in the news and my water company frequently informs me about changes being made to help out our parched state. Nowadays, I feel guilty when taking showers a few minutes longer than normal or after realizing that I emptied the rest of my glass of water down the sink, when I could have poured it over a houseplant. Gone are the three days a week of watering. For now, we’re down to two days per week through October when it will then be reduced to one.
I grew up in a state where green lawns were the norm and it was expected that no matter the cost, you’d water and water and water to keep it that way. I had always imagined I would one day become an avid lover of the lawn, watering it daily to keep the yellow sunspots away, mowing it once or twice a week because the water was working, and planting pretty flowers that are regularly thirsty. Time and water are precious and so is the money spent on water. My recent water bill shows that this month last year, the payment was over $50 more. Due to my jumping on the drought-tolerant landscaping bandwagon (try saying that five times fast), I’ve reduced my water bill and started planning for an efficiently inexpensive, yet attractive yard.
Bring on the Knowledge
To start the process, I visited my city’s website to read up on water conservation, the plants and trees native to the area, and landscaping advice. Free drought-tolerant workshops are offered throu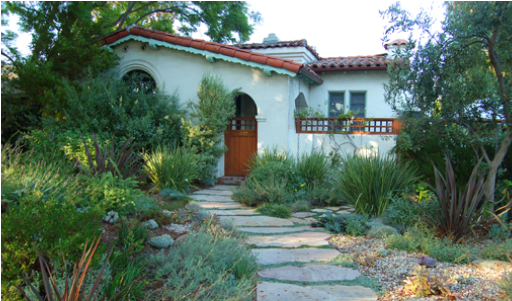 ghout the year and I signed up for one as soon as I could. I am happy I went – I was given a lot of tips, useful resources, an LED lightbulb and even a box of poppy seeds. Again, it was all free! I walked away feeling excited and confident about the work to be done. If you have the opportunity, check out one of these workshops to, at a minimum, be given the chance to ask questions of an expert in the green industry.
As an additional incentive to save money while going green, rebates can be found to help with the costs of removing the grass and installing new landscape. Whether you plan to do the work yourself or hire a company, rebates are given based on the size of the lawn to be removed. SoCal Water$mart gives rebates of $2 per square foot of turf that is replaced with drought-tolerant coverings. That means a decent rebate can be had that will either entirely pay for or put a good amount toward this project. See your city’s website for rebates in your area. And, if you’re worried that drought-tolerant landscaping won’t maintain your home’s curb appeal, check out my inspiration photo below – the options are endless and quite beautiful:
Don’t Forget Garden Gloves & A Shovel
The next step was to game plan. While there are plenty of professionals out there that remove and replace turf, I’m giving a DIY approach a go to literally dig in and learn a few things along the way. The workshop provided ideas on how to kill (harsh, I know) the existing grass and weeds. One way involves lying cardboard or plastic sheeting on top of the grass and then covering it with mulch. And, are you ready for another freebie? Several cities just give away loads of mulch! I know that doesn’t sound too exciting…it’s not like they’re giving away cars – it’s basically shredded wood and sometimes you may find a red straw or chip bag in it. Trust me, though, when you realize how much is used and the dollars you’d be spending at the store for mulch, you may find it worth it. All you need is a shovel and something to pack the mulch away in. Again, check with your city to find out where you can pick it up for free – for locations in the Los Angeles area; visit LA Sanitation's website.
I must have loaded mulch in around 30 fifty-gallon garbage bags! The mulch was stacked in the lot of a nearby park. It was actually quite comical, shoveling as much as I could while kids were playing soccer and couples were picnicking. It was not a glamorous task at all, but hey – it was FREE, which is often the best kind of deal. Home Depot has a mulch calculator available online to give you an idea of how much mulch to purchase if you go that route. Depending on the size of your lawn, it may be worth it to buy in bulk. For my lawn size, it’s recommended I purchase 50 2 cu. Ft. bags. At roughly $3 a bag, I was looking at paying at least $150 for the mulch, which is part of the reason I opted for the free stuff.

Once at home, I collected the several cardboard boxes I had kept from our move earlier this year and broke them down to lie on top of the lawn, ensuring complete coverage. Then it was time to empty all those bags of mulch on top of the cardboard. The mulch coverage is at least a couple inches thick to make sure that it adds decent weight to keep the cardboard in place. It also helps to water it slightly to encourage the settling.
Practice Patience
Currently, I am in the waiting phase of this process, as it can take a couple of months to kill the grass and ready the yard for new plants. Look into the various processes as some offer quicker results, but the DIY approach requires a bit of patience due to the time it takes for the lawn to suffocate (harsh again!). Even with the mulch on top of cardboard, the yard isn’t an eyesore. I may even pick up a small bag of pretty bark from the store to give it a little extra spunk. Once the grass has successfully been removed, it will be time to scour the local nurseries in search of drought-tolerant plants. I’m excited for where the lawn is heading within the next couple of months, the money I’ll be saving on my water bills, and my contributions toward overcoming the California drought.


%20(952%20x%20317%20px)-2.png)